37. 编写包管理工具
37.1 关于包管理工具
使用过 NodeJs 的朋友一定对 npm 命令不会陌生,可以通过 npm 安装项目需要的包或环境需要的工具,在 .NET Core 2.1+ 之后,微软也推出了新的特性,Global/Local Tools,该特性功能也正是受到 npm 启发下诞生的。
不同的是,npm 中的包采用的是 Javascript 编写并发布到 https://www.npmjs.com/ 平台,而 dotnet tools 采用 C# 编写并发布到 https://www.nuget.org/ 平台供安装使用。
37.1.2 dotnet tools 包管理好处
- 跨平台,支持
Linux/Mac/Windows平台供安装使用 - 完整的
C#生态支持 - 为所欲为~~~(拥有操作系统的权限)
37.2 了解包命令语法
通常包命令语法都遵循以下规则:
<-|--|/>argument-name<=|:| >["|']value['|"] [--] [operand] ... [operand]
在这里,Furion 将简单介绍命令常用的知识:
工具符:通常指的是你工具的唯一名称,也就是关键字,而且总是在最开头编写,如:dotnet,npm,node短参数:短参数指的是单个字符的字符串,我们通常使用-一个横杆指定参数及值,如:-v或-v 0.0.1长参数:长参数指的是一个或多个单词连接的字符串,该参数通常和短参数同时存在,通常使用--指定参数及值,如:--version或--version 0.0.1操作符:字符串中与参数值格式不匹配的任何文本都被视为操作数,任何出现在双连字符--之后且未包含在单引号或双引号中且两侧有空格的文本都被视为操作数,无论它是否与参数值格式匹配,通常用于归类/分类作用。
37.2.1 短参数例子
-a foo
| 短参数 | 参数值 |
|---|---|
| a | foo |
-ab
| 短参数 | 参数值 |
|---|---|
| a | |
| b |
-abc bar
| 短参数 | 参数值 |
|---|---|
| a | |
| b | |
| c | bar |
37.2.2 长参数例子
--foo bar
| 长参数 | 参数值 |
|---|---|
| foo | bar |
--foo --bar
| 长参数 | 参数值 |
|---|---|
| foo | |
| bar |
--foo bar --hello world
| 长参数 | 参数值 |
|---|---|
| foo | bar |
| hello | world |
37.2.3 混合参数例子
-abc foo --hello world /new="slashes are ok too"
| 短/长参数 | 参数值 |
|---|---|
| a | |
| b | |
| c | foo |
| hello | world |
| new | slashes are ok too |
37.2.4 多个值参数
--list 1 --list 2 --list 3
| 长参数 | 参数值 |
|---|---|
| list | 1,2,3 |
37.2.5 操作符
-a foo bar "hello world" -b -- -explicit operand
| 短参数 | 参数值 |
|---|---|
| a | foo |
| b |
| 操作符 |
|---|
| bar |
| "hello world" |
| -explicit |
| operand |
了解更多关于包命令语法的官方知识:https://pubs.opengroup.org/onlinepubs/9699919799/basedefs/V1_chap12.html
37.3 编写第一个包
dotnet tools 工具实际上是一个 控制台 应用程序,不同的是 .csproj 项目文件需要添加特定配置。下面将给大家编写一个 HelloTools 包管理工具。
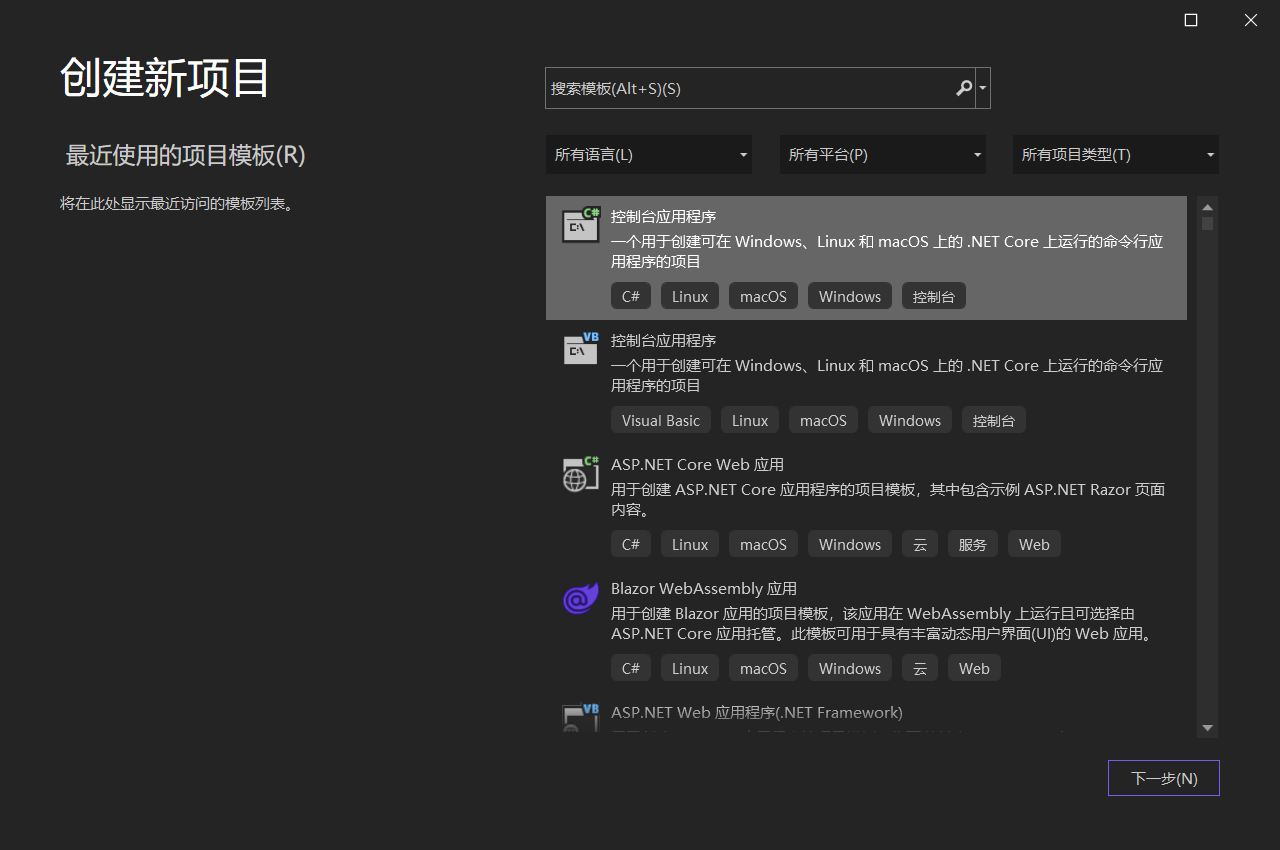
37.3.1 创建 HelloTools 控制台应用
37.3.2 编辑 HelloTools.csproj
将控制台项目标记成 dotnet tools 需要配置以下节点,如下图所示:
<Project Sdk="Microsoft.NET.Sdk">

    <PropertyGroup>
        <OutputType>Exe</OutputType>
        <TargetFramework>net5.0</TargetFramework>
    <Version>0.0.1</Version>
    <Description>第一个 dotnet tools 工具</Description>
        <ToolCommandName>hello-tools</ToolCommandName>
        <PackAsTool>true</PackAsTool>
        <GeneratePackageOnBuild>true</GeneratePackageOnBuild>
        <PackageOutputPath>./nupkg</PackageOutputPath>
    </PropertyGroup>

</Project>
配置关键节点说明
Version:包工具版本号Description:包工具介绍ToolCommandName:包工具关键字,如dotnet、npm,后续使用都是通过该关键字使用PackAsTool:是否声明为包管理工具,设置trueGeneratePackageOnBuild:是否编译时自动生成.nupkg包,方便后续上传到Nuget平台PackageOutputPath:配置.nupkg包存储目录,推荐使用./nupkg
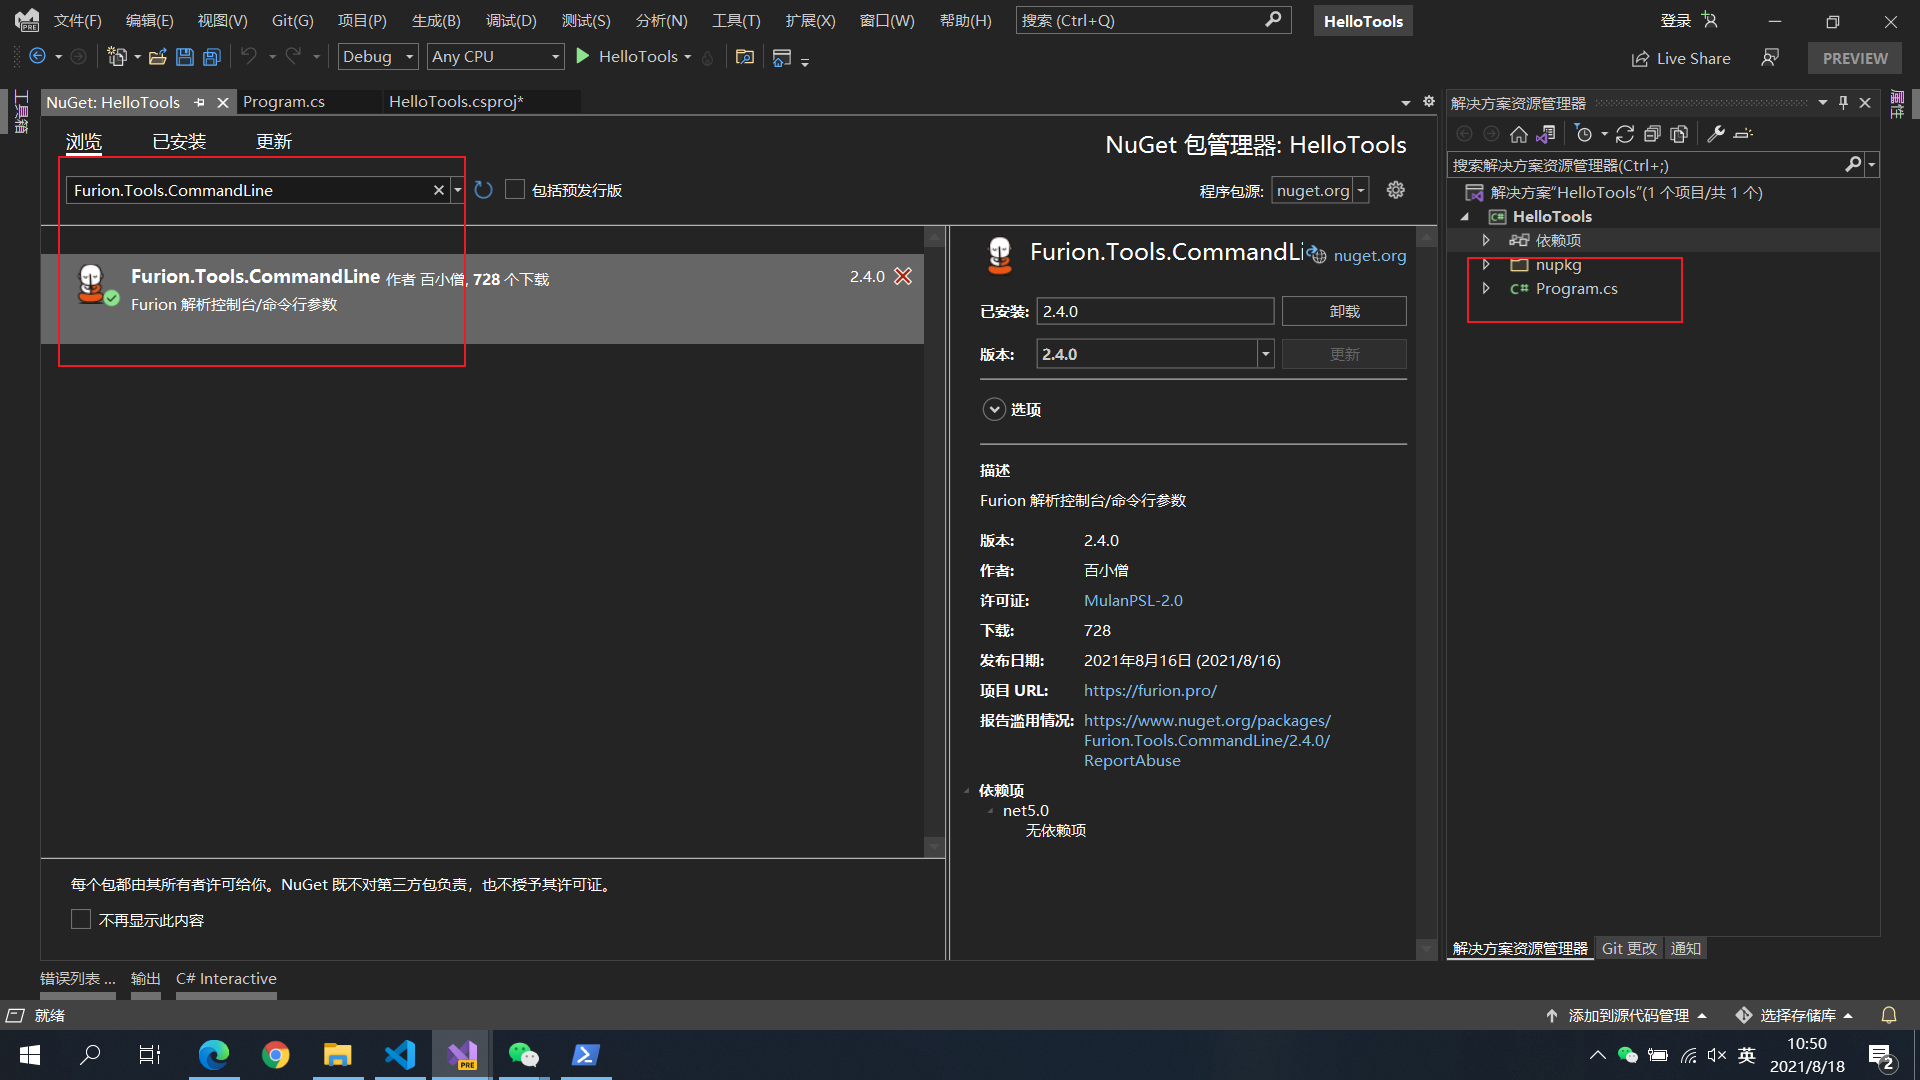
37.3.3 安装 Furion.Tools.CommandLine 包
为了方便管理工具包开发,Furion 官方特意开发了 Furion.Tools.CommandLine 包,帮助大家快速开发管理工具包。
37.3.4 编写逻辑代码
我们先定义几个需求,然后编写逻辑代码:
需求一:输入
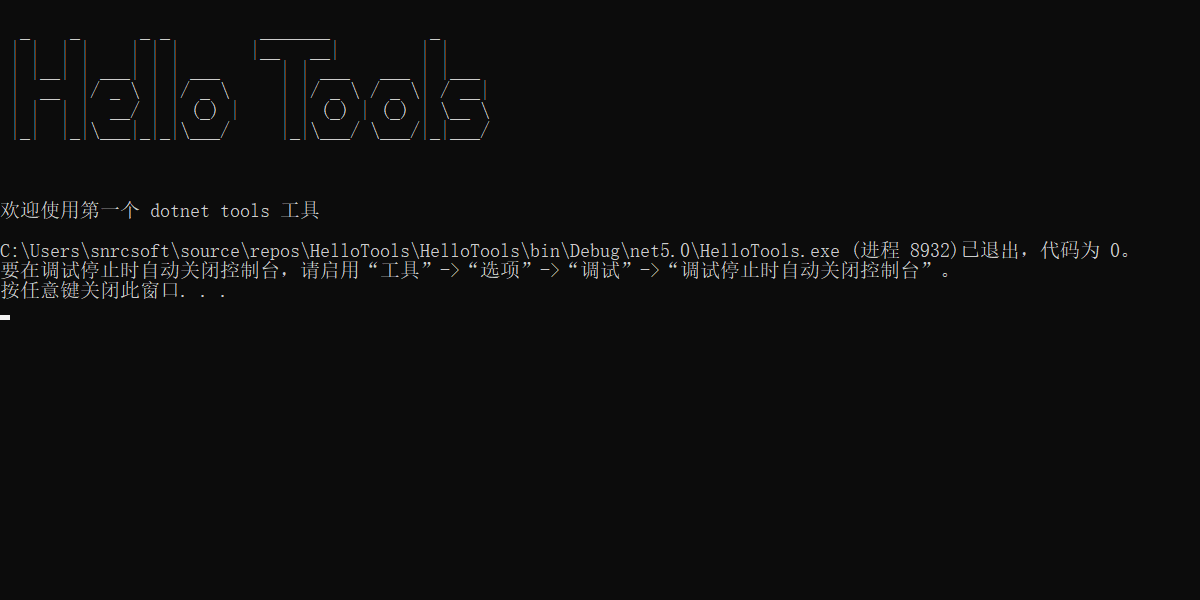
hello-tools打印介绍信息,可通过 👏生成字符 LOGO👏 工具生成Logo需求二:输入
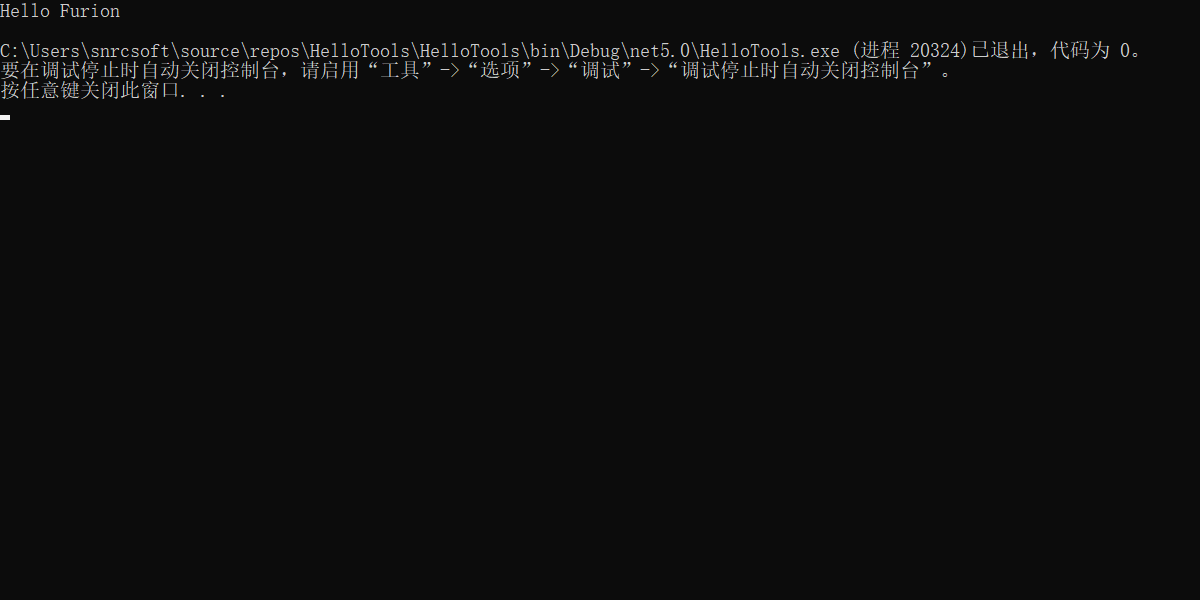
-n或--name输出Hello 名字需求三:输入
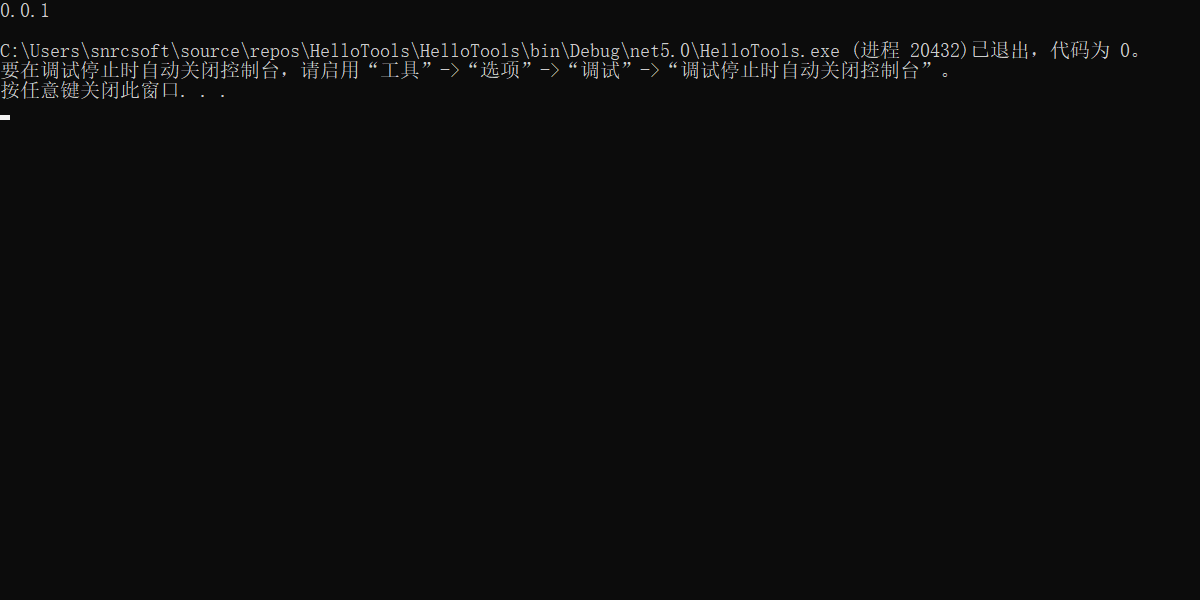
-v或--version输出当前版本需求四:输入
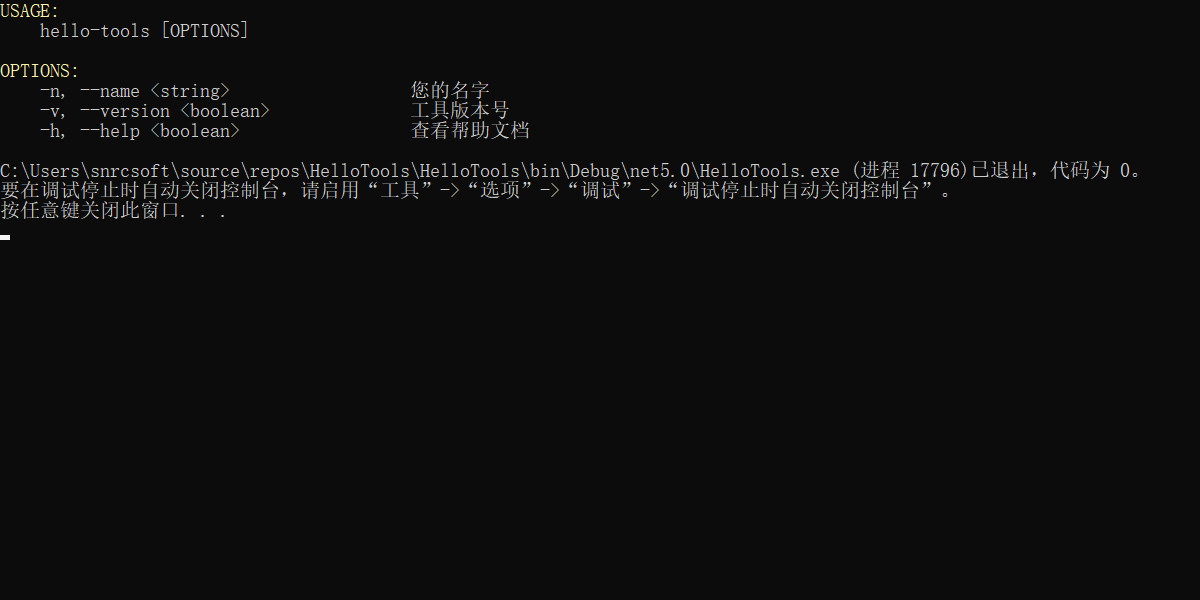
-h或--help输出帮助文档
using Furion.Tools.CommandLine;
using System;
using System.Collections.Generic;

namespace HelloTools
{
    class Program
    {
        // 通过 Cli.Inject() 完成准备工作
        static void Main(string[] args) => Cli.Inject();

        /// <summary>
        /// 输出 Hello 名字
        /// </summary>
        [Argument('n', "name", "您的名字")]
        static string Name { get; set; }
        // 定义参数处理程序,必须 [属性名]+Handler
        static void NameHandler(ArgumentMetadata argument)
        {
            Console.WriteLine($"Hello {Name}");
        }

        /// <summary>
        /// 查看版本
        /// </summary>
        [Argument('v', "version", "工具版本号")]
        static bool Version { get; set; }
        // 定义参数处理程序,必须 [属性名]+Handler
        static void VersionHandler(ArgumentMetadata argument)
        {
            Console.WriteLine(Cli.GetVersion());
        }

        /// <summary>
        /// 查看帮助文档
        /// </summary>
        [Argument('h', "help", "查看帮助文档")]
        static bool Help { get; set; }
        // 定义参数处理程序,必须 [属性名]+Handler
        static void HelpHandler(ArgumentMetadata argument)
        {
            Cli.GetHelpText("hello-tools");
        }

        // 所有未匹配的参数/操作符处理程序,固定 NoMatchesHandler 方法名
        static void NoMatchesHandler(bool isEmpty, string[] operands, Dictionary<string, object> noMatches)
        {
            if (isEmpty)
            {
                Console.WriteLine(@"
  _    _      _ _         _______          _
 | |  | |    | | |       |__   __|        | |
 | |__| | ___| | | ___      | | ___   ___ | |___
 |  __  |/ _ \ | |/ _ \     | |/ _ \ / _ \| / __|
 | |  | |  __/ | | (_) |    | | (_) | (_) | \__ \
 |_|  |_|\___|_|_|\___/     |_|\___/ \___/|_|___/


");
                Console.WriteLine($"欢迎使用{Cli.GetDescription()}");
            }
        }
    }
}
代码说明
Furion工具包提供了非常方便的Cli.Inject()方法,可以实现一次性完成所有初始化工作,只需要在Main方法调用即可- 通过
[Argument(短参数,长参数,提示文档)]定义每一个参数属性,参数必须是static静态 - 通过
[属性名]Handler定义每个参数匹配后的处理程序,如:VersionHandler,格式为:static void 属性名Handler(ArgumentMetadata argument) - 通过固定方法名
NoMatchesHandler定义未匹配的参数及操作符,该方法有三个参数:isEmpty:判断是否没有传递任何参数,通常用于输出介绍operands:获取所有操作符列表noMatches:获取所有未匹配的参数字典
37.3.5 如何调试包工具 👏
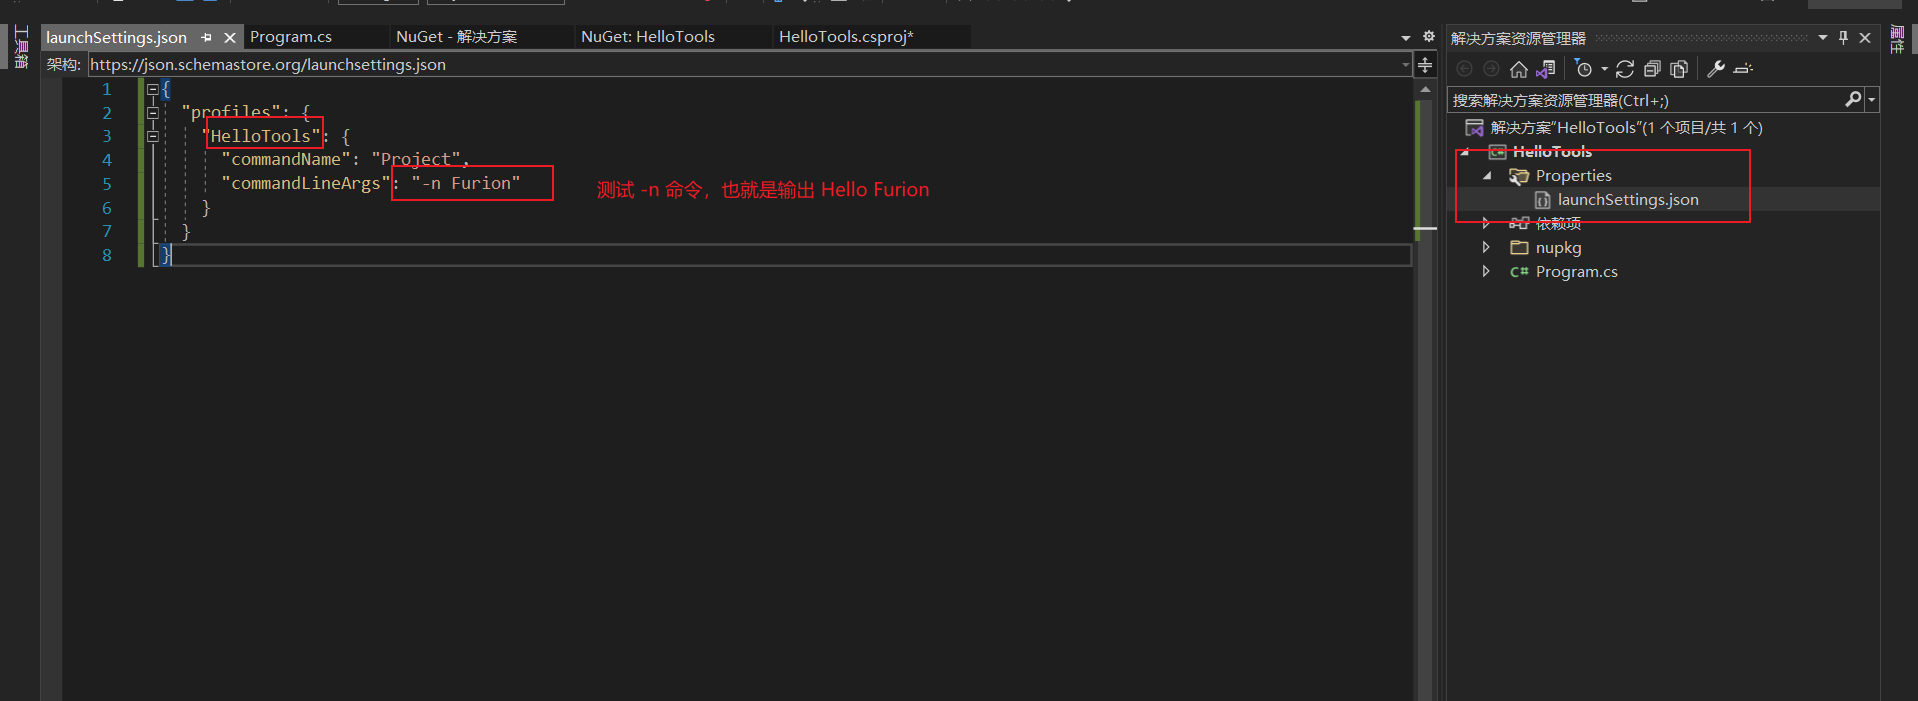
包管理工具调试有别于普通的控制台,主要区别是测试各个参数的使用,也就是如何传递 Main 方法的 args 参数。只需要以下两个步骤即可:
- 在项目根目录添加
Properties目录 - 在
Properties目录中添加launchSettings.json文件,并遵循以下规则:
{
  "profiles": {
    "项目名称": {
      "commandName": "Project",
      "commandLineArgs": "你的命令"
    }
  }
}
项目名称:写你的项目实际名称,如:HelloToolscommandName:固定为ProjectcommandLineArgs:编写测试命令,只需要写参数/操作符部分即可,如:-v,-v -h --Name Furion
如,我们需要测试 HelloTools 的 -n 参数
{
  "profiles": {
    "HelloTools": {
      "commandName": "Project",
      "commandLineArgs": "-n Furion"
    }
  }
}
点击 运行/调试/F5 启动调试
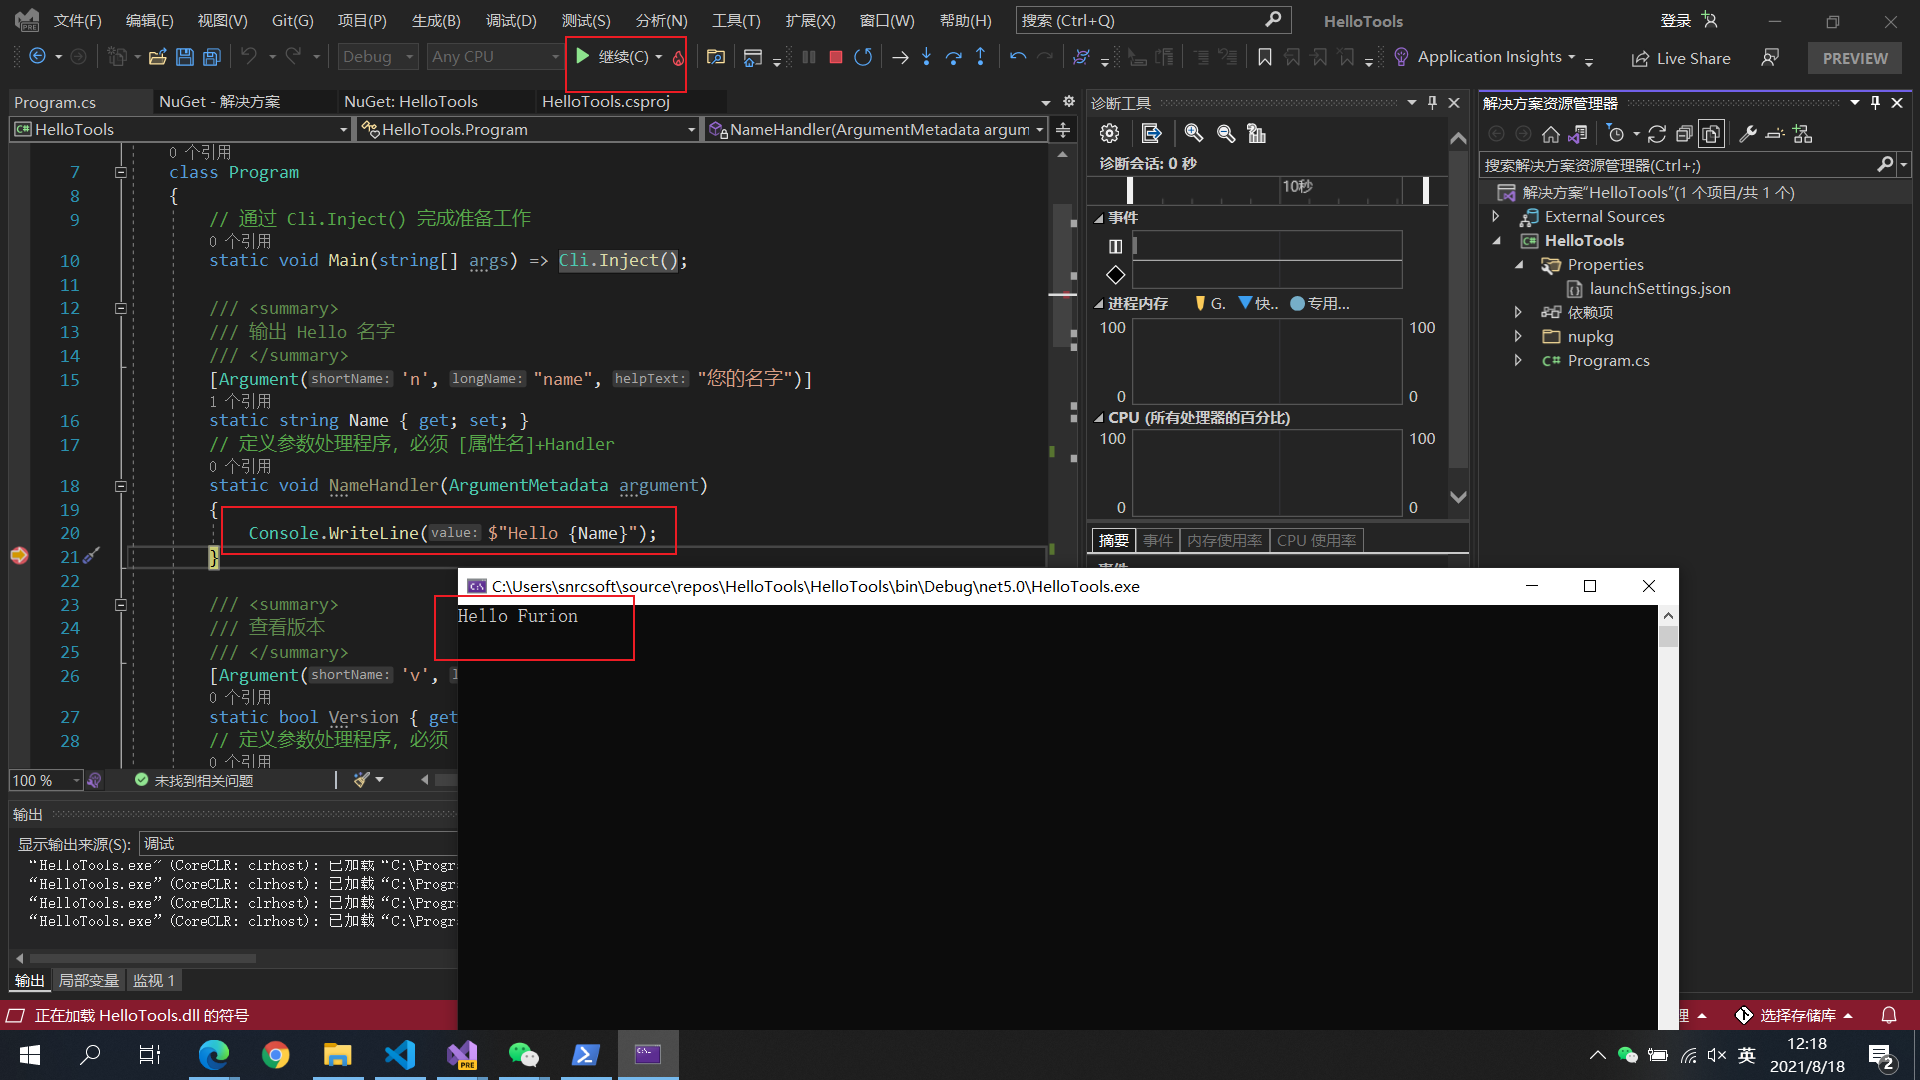
37.3.6 测试各个参数情况
需求一:输入
hello-tools打印介绍信息
{
  "profiles": {
    "HelloTools": {
      "commandName": "Project",
      "commandLineArgs": ""
    }
  }
}
需求二:输入
-n或--name输出Hello 名字
{
  "profiles": {
    "HelloTools": {
      "commandName": "Project",
      "commandLineArgs": "-n Furion"
    }
  }
}
需求三:输入
-v或--version输出当前版本
{
  "profiles": {
    "HelloTools": {
      "commandName": "Project",
      "commandLineArgs": "--version"
    }
  }
}
需求四:输入
-h或--help输出帮助文档
{
  "profiles": {
    "HelloTools": {
      "commandName": "Project",
      "commandLineArgs": "-h"
    }
  }
}
37.4 打包(本机)测试
刚刚我们已经学会调试包工具了,但是还未做到类似 npm 包一样,在 cmd/powershell 中安装之后可在命令行全局测试,下面将教大家如何实现 全局安装 和 本地安装。
37.4.1 全局打包安装
全局打包安装就是配置在系统环境变量中,在任何地方都可以使用。
在 HelloTools 项目根目录下打开 cmd/powershell(尽量使用管理员工具)执行以下命令:
✔ 安装全局包
dotnet tool install --global --add-source ./nupkg HelloTools
其中 HelloTools 就是 项目名称。
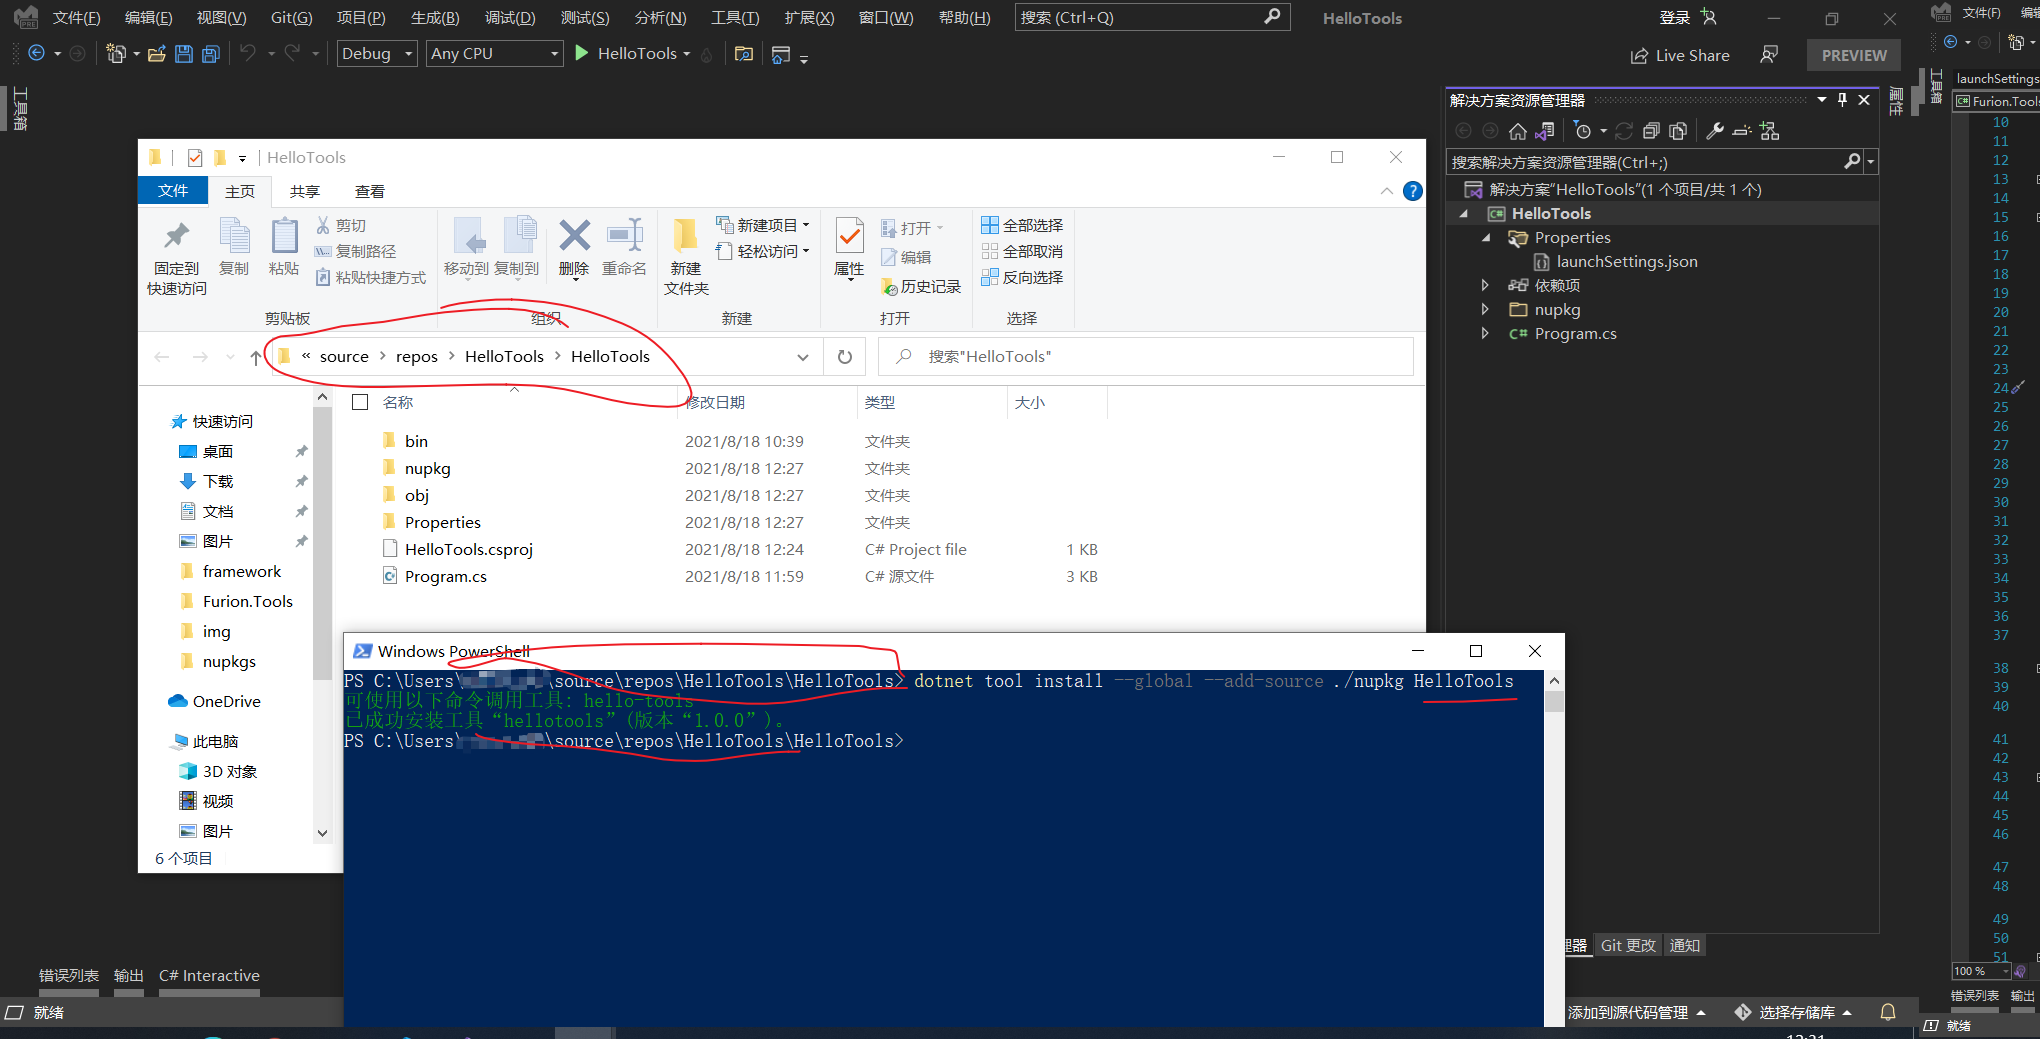
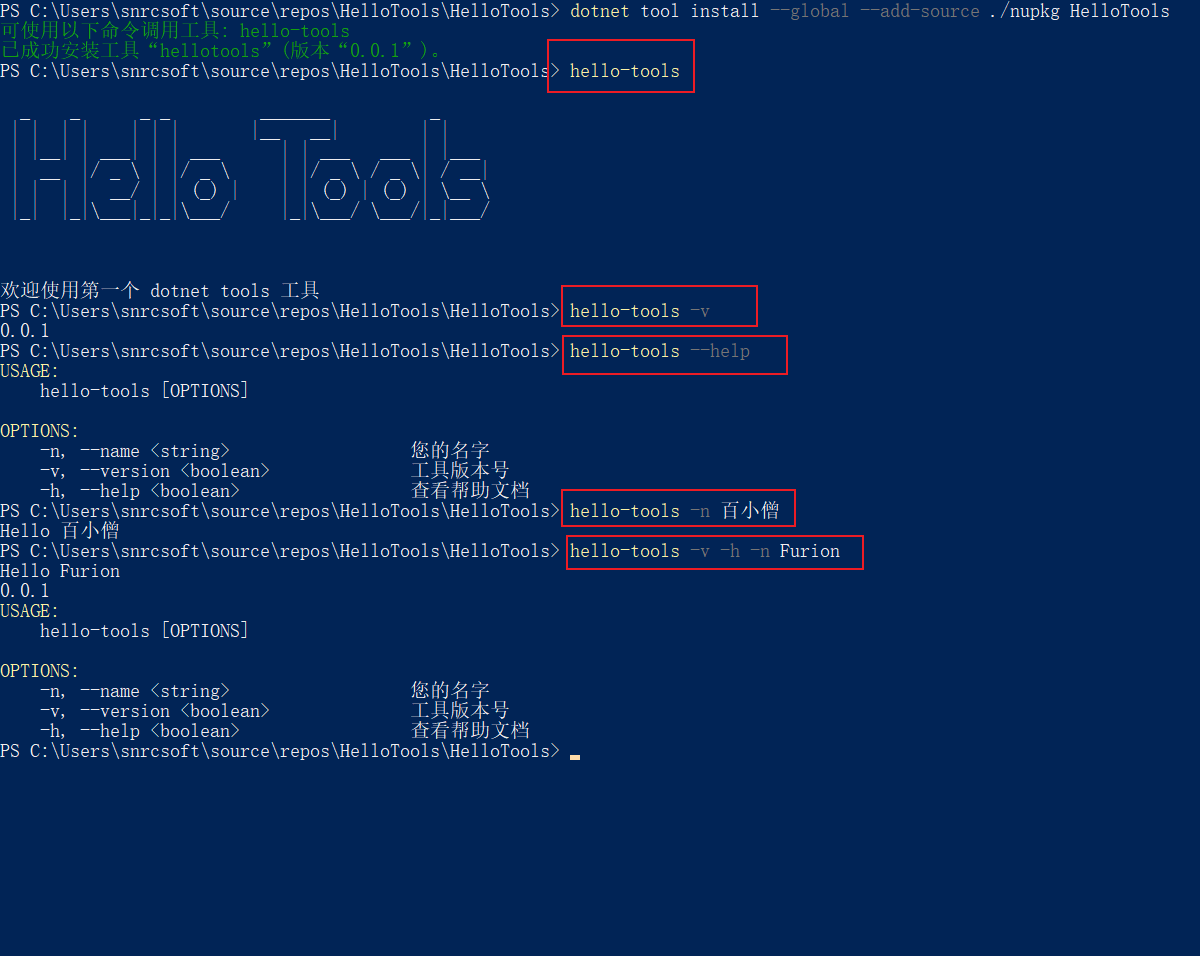
之后我们就可以通过之前 HelloTools.csproj 中配置的 <ToolCommandName>hello-tools</ToolCommandName> 使用了。
✔ 测试全局包
✔ 更新全局包
如果源码发生改变,只需要编译项目后重新更新包工具即可:
dotnet tool update --global --add-source ./nupkg HelloTools
✔ 卸载全局包
dotnet tool uninstall --global HelloTools
想了解更多全局打包安装知识查阅官方文档即可:https://docs.microsoft.com/zh-cn/dotnet/core/tools/global-tools-how-to-use
37.4.2 本地打包安装
本地打包安装就是只有在项目所在目录及子孙目录方可使用。
在 HelloTools 项目根目录下打开 cmd/powershell 执行以下命令:
✔ 创建本地清单文件
dotnet new tool-manifest
执行该命令后会自动创建 .config 文件夹并添加 dotnet-tools.json 文件:
{
  "version": 1,
  "isRoot": true,
  "tools": {}
}
注意事项
通常该文件内容不需要手动更改。
✔ 安装本地包
dotnet tool install --add-source ./nupkg HelloTools
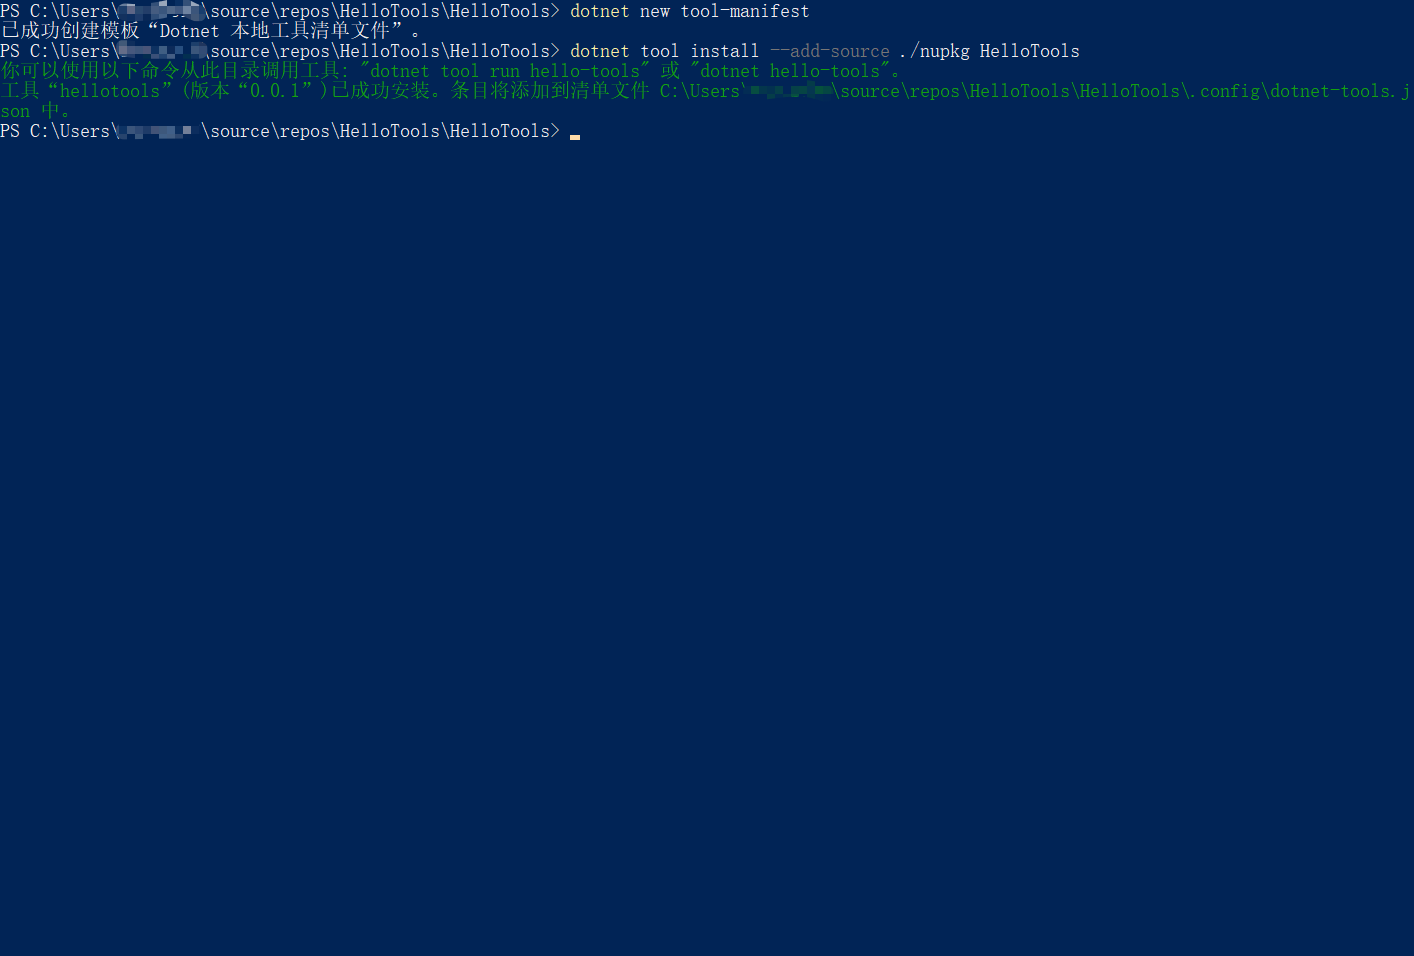
✔ 测试本地包
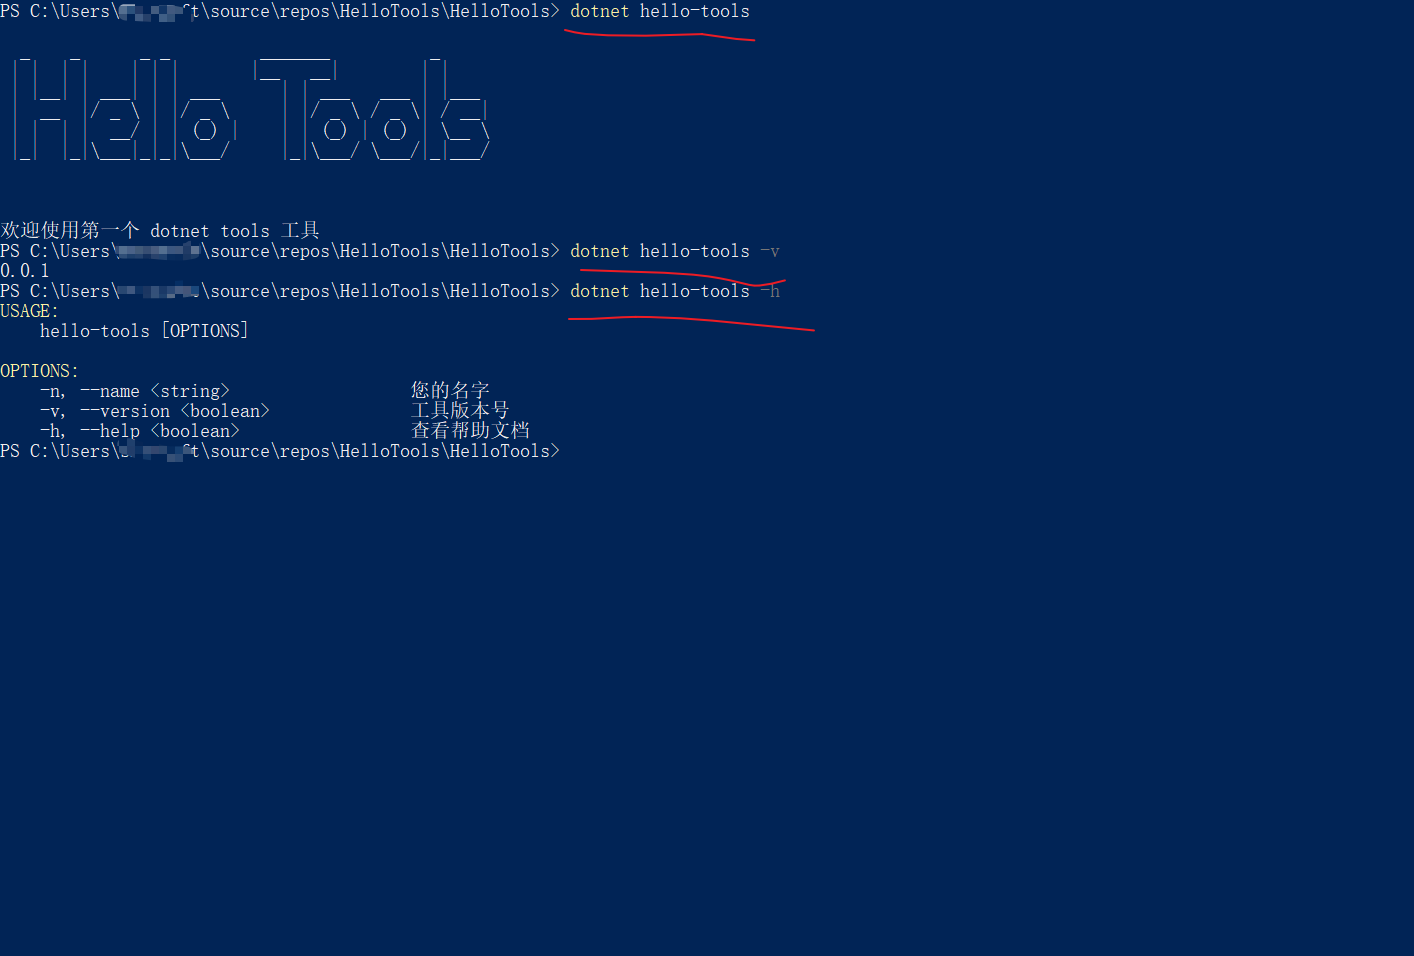
本地包测试和全局包不一样的是本地包是通过 dotnet 关键字 参数 测试:
dotnet hello-tools -n Furion
✔ 更新本地包
如果源码发生改变,只需要编译项目后重新更新包工具即可:
dotnet tool update --add-source ./nupkg HelloTools
✔ 卸载本地包
dotnet tool uninstall HelloTools
想了解更多本地打包安装知识查阅官方文档即可:https://docs.microsoft.com/zh-cn/dotnet/core/tools/local-tools-how-to-use
37.5 发布到 Nuget 平台 👏
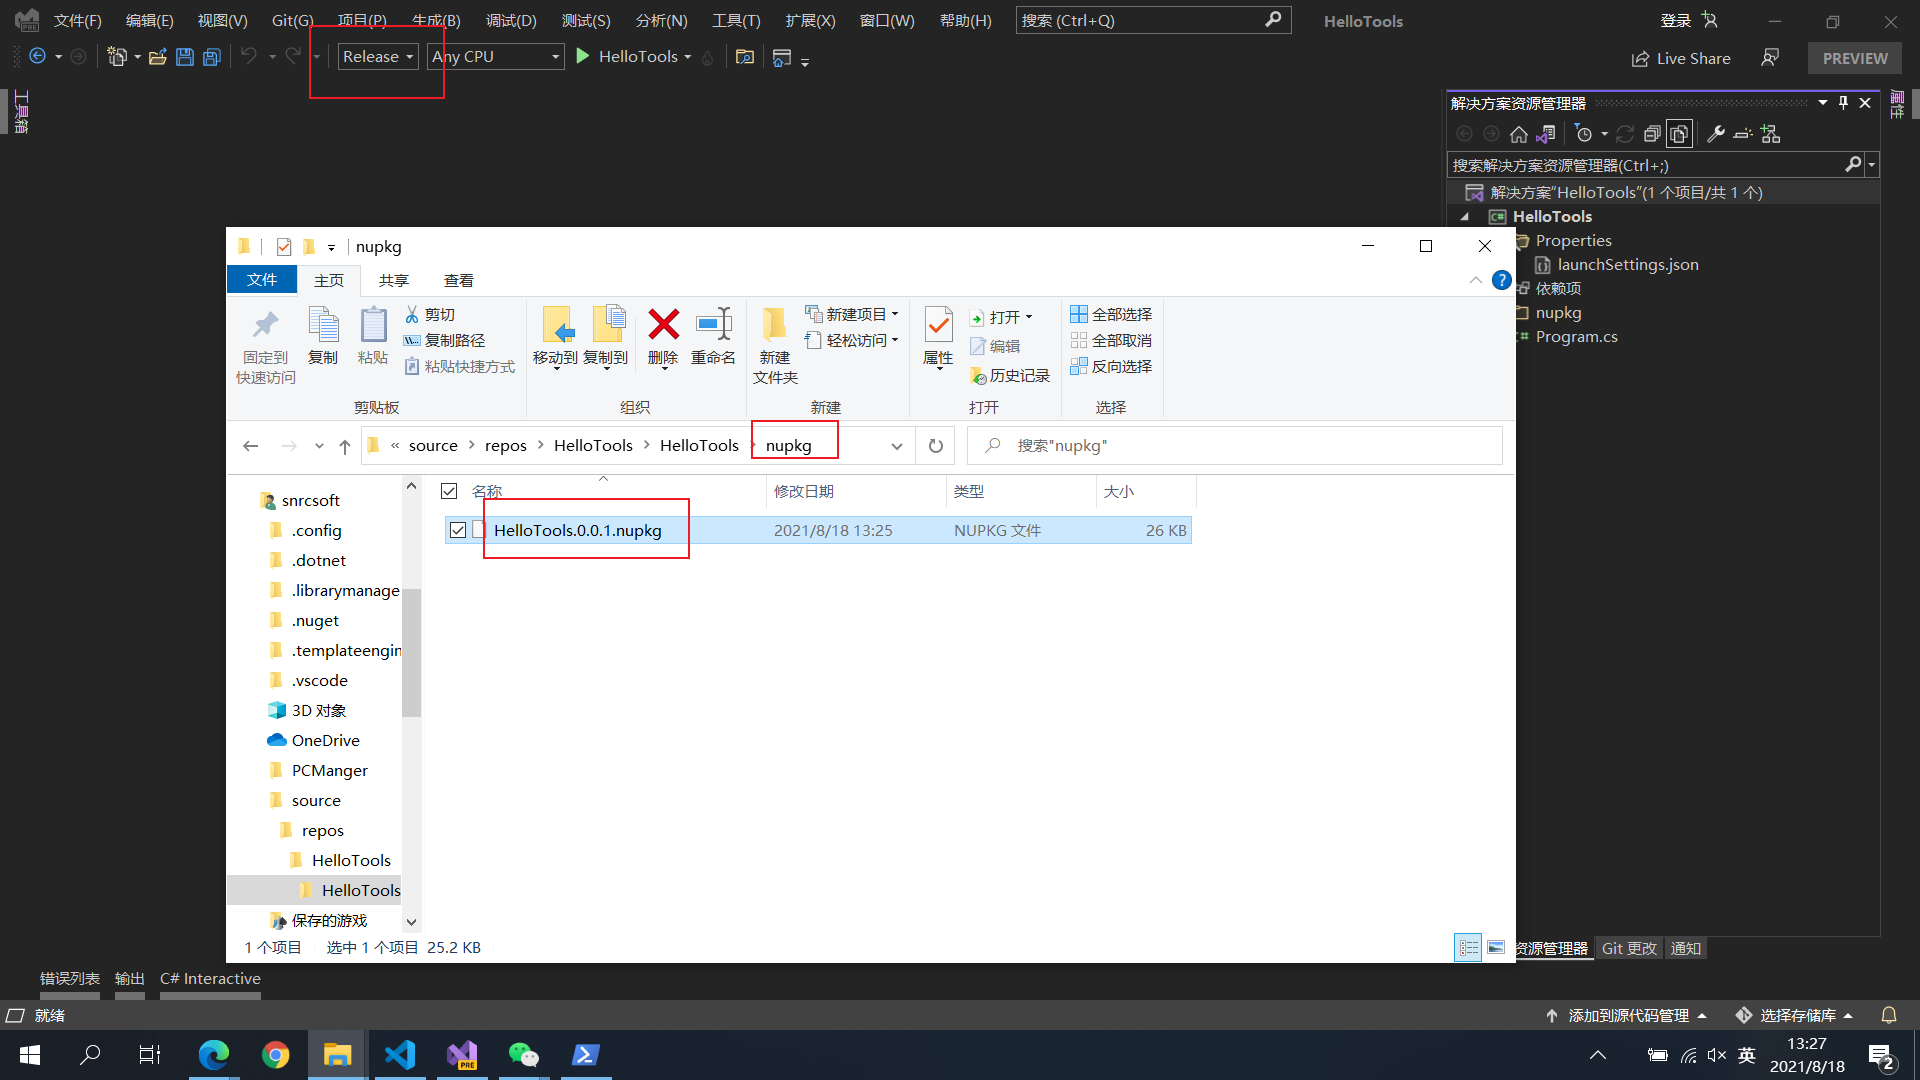
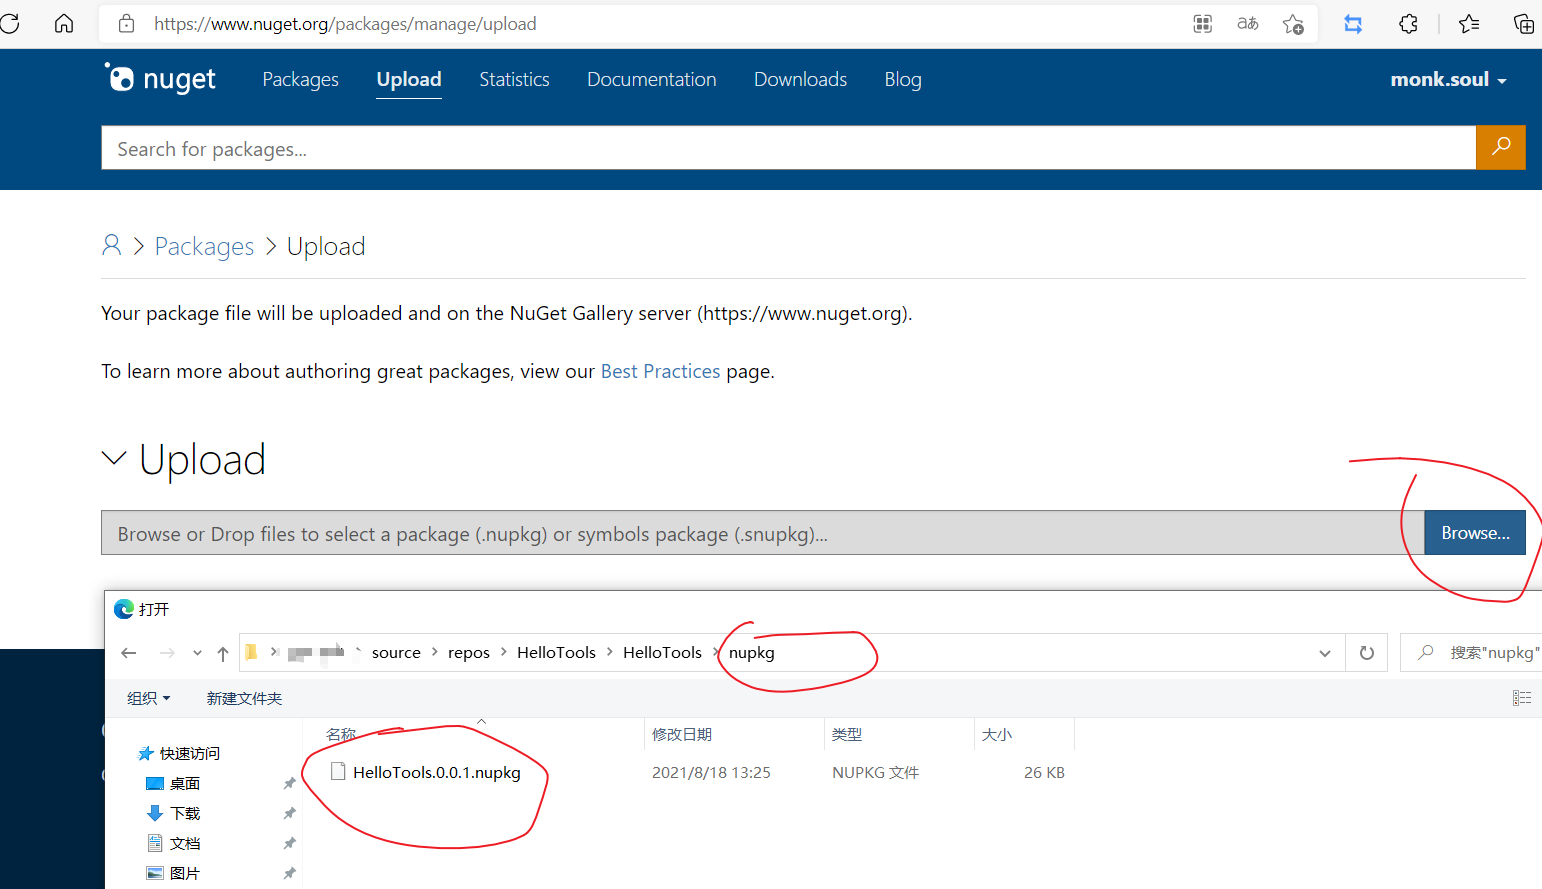
发布到 Nuget 平台非常简单,只需要两个步骤即可:
- 切换项目
Debug模式到Release并重新编译项目 - 在
Nuget平台上传nupkg文件夹对应项目名称.版本号.nupkg文件即可:https://www.nuget.org/packages/manage/upload
上传 Nuget 平台补齐信息
建议上传到 Nuget 平台编辑 .csproj 文件补齐以下信息:
<Project Sdk="Microsoft.NET.Sdk">

    <PropertyGroup>
        <OutputType>Exe</OutputType>
        <TargetFramework>net5.0</TargetFramework>
        <Version>0.0.1</Version>
        <Description>第一个 dotnet tools 工具</Description>
        <ToolCommandName>hello-tools</ToolCommandName>
        <PackAsTool>true</PackAsTool>
        <GeneratePackageOnBuild>true</GeneratePackageOnBuild>
        <PackageOutputPath>./nupkg</PackageOutputPath>

        <Authors>百小僧</Authors>
        <Company>Baiqian Co.,Ltd.</Company>
        <Product>Furion</Product>
        <Copyright>© 2020-2021 百小僧, Baiqian Co.,Ltd.</Copyright>
        <RepositoryUrl>https://gitee.com/dotnetchina/Furion</RepositoryUrl>
        <RepositoryType>Gitee</RepositoryType>
        <GeneratePackageOnBuild>true</GeneratePackageOnBuild>
        <PackageLicenseExpression>MulanPSL-2.0</PackageLicenseExpression>
        <PackageProjectUrl>https://furion.icu</PackageProjectUrl>
    </PropertyGroup>

    <ItemGroup>
        <PackageReference Include="Furion.Tools.CommandLine" Version="2.6.0" />
    </ItemGroup>

</Project>
发布到 Nuget 平台后,别人就可以通过:
✔ 安装 Nuget 包到本地
dotnet tool install --global 项目名 --version 版本号
37.6 Cli 静态类说明
为了简化包工具的开发,Furion.Tools.CommandLine 的 Cli 静态类提供了很多方便的静态方法:
37.6.1 消息类
// 输出空行
Cli.EmptyLine();

// 输出一行
Cli.WriteLine("消息");
Cli.WriteLine("消息", ConsoleColor.Blue);   // 字体颜色
Cli.WriteLine("消息", ConsoleColor.Blue, ConsoleColor.White);   // 背景颜色
Cli.WriteLine("消息", ConsoleColor.Blue, ConsoleColor.White, fillLine: true);   // 填充整行

// 输出(不换行)
Cli.Write("消息");
Cli.Write("消息", ConsoleColor.Blue);   // 字体颜色
Cli.Write("消息", ConsoleColor.Blue, ConsoleColor.White);   // 背景颜色
Cli.Write("消息", ConsoleColor.Blue, ConsoleColor.White, fillLine: true);   // 填充整行

// 输出提示消息
Cli.Success("成功");
Cli.Warn("警告");
Cli.Error("错误");
Cli.Tip("提示");

// 收集用户输入(支持多行)
var inputs = Cli.ReadInput(); // 输入 exit 退出输入

// 选择消息
var selectId = Cli.ReadOptions("请选择喜欢的水果:", new []{ "西瓜", "苹果", "凤梨"});  // selectId 从 1 开始
37.6.2 工具类
// 完成参数填充属性初始化操作
Cli.Inject();

// 获取参数所有信息
var arguments = Cli.ArgumentMetadatas;

// 手动检查参数是否匹配
Cli.Check(nameof(属性名), argument => {
    // 如果用户输入该参数
    if(argument?.IsTransmission == true){
        Cli.WriteLine(argument.Value);
    }
    else {
        Cli.Error("用户没有输入");
    }
});

// 只有参数匹配才进入
Cli.CheckMatch(nameof(属性名), argument => {
    Cli.WriteLine(argument.Value);
})

// 无属性检查
Cli.Check(new[] {"v", "version"}, (isMatch, value) => {
    // 如果用户输入该参数
    if(isMatch){
        Cli.WriteLine(value);
    }
    else {
        Cli.Error("用户没有输入");
    }
});

// 无属性匹配
Cli.CheckMatch(new[] {"v", "version"}, value => {
    Cli.WriteLine(value);
});

// 所有未匹配的参数、操作符
Cli.CheckNoMatches((isEmpty, operands, noMatches) => {
     if (isEmpty) Cli.WriteLine($"欢迎使用 {Cli.GetDescription()}");
     if (operands.Length > 0) Cli.Error($"未找到该操作符:{string.Join(",", operands)}");
     if (noMatches.Count > 0) Cli.Error($"未找到该参数:{string.Join(",", noMatches.Keys)}");
});

// 解析 Main 方法参数信息
var argumentModel = Cli.Parse();

// 手动解析命令字符串
var argumentModel = Cli.Parse("-abc foo --hello world");

// 终止输出/结束输出
Cli.Exit();
37.6.2 信息类
// 获取当前工具包版本号
var version = Cli.GetVersion();

// 获取当前工具包描述
var description = Cli.GetDescription();
37.6.3 其他类
我们可以通过 Environment 获取当前环境更多信息,如下图所示:
// 当前执行命令目录
var currentDirectory = Environment.CurrentDirectory;

// 获取机器名称
var machineName = Environment.MachineName;

// 等等。。。。。
37.7 反馈与建议
与我们交流
给 Furion 提 Issue。
